
Configure CCH Axcess SSO with Azure AD
Legacy Content Warning: The post is now out-of-date (first posted on September 9, 2020). While it may still be helpful as a reference, please note the content and steps are missing critical steps to finish the process. As of today, I have no plans to update the information. With that said, I have kept this post as a historical reference. Public comments (if open) are always welcome at the bottom of the post to help the next person. For any configuration help, I recommend creating a support case with Wolters Kluwer. As always, I appreciate you stopping by!
Single Sign-on is a huge time saving, stress relief, and secure choice to consider when using the CCH Axcess Tax Software. One possible choice for the SSO configuration is Microsoft Azure Active Directory. The below guide will assist with this setup.
Wolters Kluwer has Solution ID 000108412 to overview this setup.
Quick Tip: If you have any difficulties with the SSO setup in this guide or in Wolters Kluwer knowledgebase, you may have to put in support a ticket to verify the feature is enabled on your account.
Setup Azure for CCH Axcess SSO
- Login to the Azure Active Directory Portal.
- Go to Enterprise applications > New Application
- In the Add a Application menu, choose “Non-gallery” application
- Add a name for your application. I entered “CCH Axcess Tax” > Add
- In the manage grouping, select “Single Sign-on”
- For the single sign-on method, select SAML
- Scroll down to section 3, “SAML Signing Certificate.” Download the Certificate (Base64). The certificate will download as the name you used in step 4. In our example, “CCH Axcess Tax.cer” The certificate will be used in a later step.
Stay signed in and on this screen to reference for later steps.
- Launch CCH Axcess Dashboard > Choose Application Links
- In the Firm grouping, choose Settings and defaults
- In the resulting window, navigate to Login setup
- Scroll to the bottom of the page, in the Federation Services settings, check the box “Enable Pilot mode for Federation Services Login”
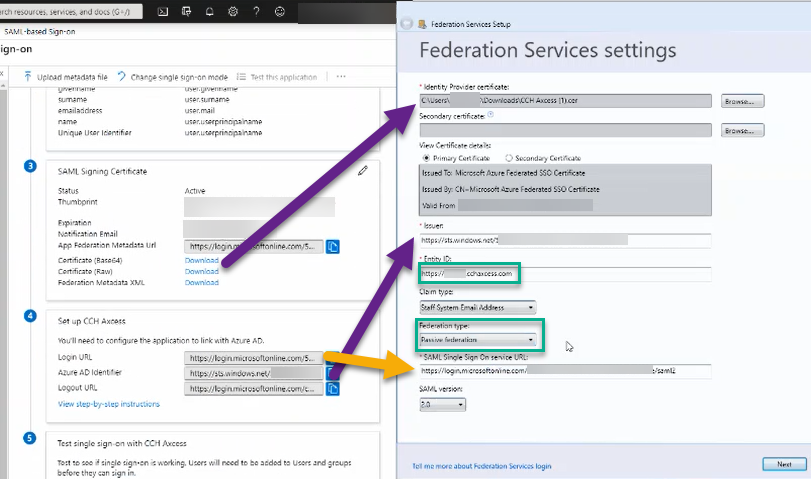
- In the resulting window, click Browse… next to “Identity Provider certificate” Navigate to the certificate found in step 7, “CCH Axcess Tax.Cer”
- Referencing section 4 in the SAML-based Sign-on page, copy the URL for Azure AD Identifer and paste the link into “Issuer” on the Federation Services settings.
- The Entity ID should be a unique value that does not resolve. In this field, I suggest putting https://contoso.cchaxcess.com where contoso is your domain.
- Change the Federation type to Passive Federation
- Next, the SAML Single Sign On Service URL should be set to the value Logon URL (section 4).
To this point, your values should reflect the following:
- Hit next
- Select Generate metadata and save it to your desired location
- Back on the SAML-based Sign-on configuration page (at the top), choose Upload metadata file. Browse to the location you saved the file in step 17 and choose Add.
- Click Save in the next window.
- If prompted to Test single sign-on with your app, choose No, I’ll test later.
- Next, on the Azure page, navigate from Single Sign-on to Users and Groups.
- Assign the Azure Enterprise App to your beta Users by clicking Add user > Add individual account or a group. Click Select. Click Assign.
Testing Single Sign-On with your Pilot/Beta group
At this stage, you are ready to test the configuration!
Info Before proceeding in testing, verify your pilot CCH Axcess staff accounts have an email address that match the attribute Mail in Azure Active Directory.
On the workstation you wish to enable SSO:
- Verify the Pilot/Beta user is assigned the Azure Enterprise App (step 22 in previous section)
- Login to CCH Axcess Dashboard with the credentials you wish to test SSO
- Go to Utilities
- Click on “Generate Federation Services Pilot Login Code”
- On the next window, choose “Generate Pilot Login Code”
- Click Close
- Completely close the CCH Axcess Application
- Launch and verify SSO configuration
Info To remove this configuration: Control Panel > system > Advanced System Settings > Advanced tab > Environment Variables > Remove variable CCHPilotADFS
Enable for all users
Important This can only be enabled by the Default Axcess Administrator Account
Info Before proceeding in site wide enablement, verify all CCH Axcess staff accounts have an email address that match the attribute Mail in Azure Active Directory.
- Verify all CCH Tax User accounts are assigned to the Azure Enterprise App
- Pilot SSO with Default Axcess Administrator Account
- Open CCH Axcess Dashboard > Application Links > Settings and Defaults (Under Firm)
- Select Login Setup
- Select Federation Services as the login mode
- Click Finish
Final Words
A lot of additional configuration is not covered in this post that should be strongly considered. For example, implementation of conditional access policies to prompt for two-factor verification. Since employees will be accessing confidential tax data, I suggest reviewing applicable authentication security goals for your firm.
Anyways, I have to jet. Off for a five mile (eight kilometer) run. Hope you have a splendid day!
Leave a comment