
Invoke-RestMethod for ShareFile REST API
The ShareFile PowerShell SDK is absolutely great for accessing and working with the ShareFile REST API. On a downside, the ShareFile snap-in may sometimes be a bit outdated since the ShareFile team needs to release a new PowerShell version for any new values added to an object. When you go to https://api.sharefile.com/rest/ to review the available API Entities, you may find yourself disappointed that the results are not accessible when using the PowerShell snap-in. Often, no errors will appear or the errors are cryptic. For example, one error that may be returned is as follows:
Internal Server Error, reason: Unspecified.
Then to add to the confusion, you will find that the results are attainable when providing the appropriate information on the same website since JSON responses are updated in real-time.
Sometimes, this real-time data is needed for a project or script. In this instance, the Invoke-RestMethod Cmdlet is our tool for the job.
Before You Begin
At the time of this post, in order to create an OAuth token to use Invoke-RestMethod you must be a ShareFile Super User.
Of course, we are using Windows PowerShell so be sure that you have access on your workstation to this Windows utility.
Generating your OAuth token
Before we can use Invoke-RestMethod, an OAuth Token needs to be created with ShareFile. To do this, navigate to https://api.sharefile.com/rest/oauth2-request.aspx
On this page, you will need to authenticate with your ShareFile credentials if you have not already done so by clicking the link “Click here” to login.
Upon successful authentication, you should be redirected to the OAuth Token request page. You will need to enter:
- Application Name
- description (Optional)
- Redirect URI or check the Box “I don’t know or will not use a redirect URI”
After filling in your information, choose Generate API Key. Here are the values I used:
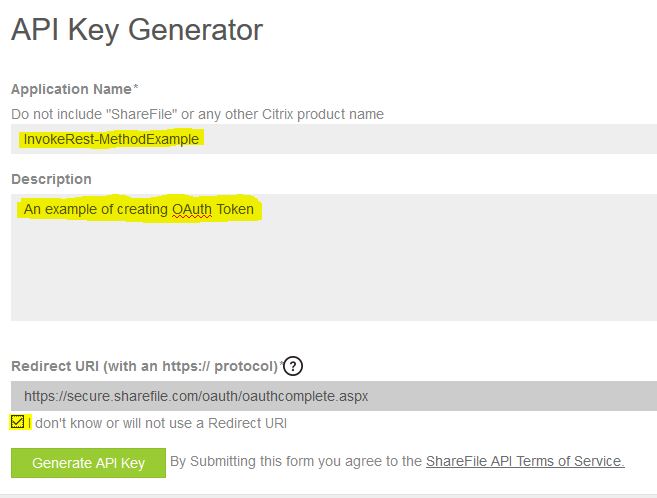
After generation, at the bottom of the page in the Your API Keys section, record the Client ID and the Client Secret for later use.
Invoke-RestMethod
With our information in hand, we are now ready to use the Invoke-RestMethod Cmdlet.
$tokenRoute = "https://subdomain.sharefile.com/oauth/token"

$creds = @{
  username = "$username"
  password = "$password"
  client_secret = "$clientSecret"
  client_id = ""$clientID"
  grant_type = "password"
}
For $tokenRoute be sure to update the ‘subdomain’ to your subdomain for ShareFile domain. The $username is your ShareFile username. For example, myEmail@sharefile.com. $password is your ShareFile password. $clientSecret and $clientID is obtained from the Your API keys section recorded earlier.
For our access token:
$response = Invoke-RestMethod $tokenroute -Method POST -Body $creds -ContentType "application/x-www-form-urlencoded"
$accessToken = $response.access_token
Getting the JSON response
From here, you are now ready to get the real-time data.
For example, if I wanted to retrieve the JSON data from a ShareFile Report.
$theURI = https://subdomain.sf-api.com/sf/v3/Reports/Record(id)/GetJsonData
$reportData = Invoke-RestMethod -Uri $theURI -Method GET -Headers @{"Authorization"="Bearer $accessToken"} -ContentType "application/json"
ConvertFrom-Json $reportData
You will need to update $theURI to include your subdomain and the ID of your report.
Removing your OAuth Token
This is a nice solution for when the ShareFile PowerShell snap-in is unable to get the data
you require. However, on the next iteration of the ShareFile Snap-in, you may no longer need this method. To remove the OAuth token, navigate to https://api.sharefile.com/rest/oauth2-request.aspx
Authenticate with your ShareFile credentials if not already logged in. At the bottom of the page, in the Your API keys section, locate your Application name and to the right choose the trash can icon to remove.
Well, time to hit the road again.
Cheers,
Jeremiah
Leave a comment